How To Mount A Projector? ñ Ceiling Mount, Shelf & Tripod Mount
In this brief article, we have explained how to mount a projector on the ceiling, wall/shelf mounting, and projector tripod mount using ridiculously easy steps.
Mounting a projector on the ceiling or wall serves a rather professional and polished look for the home theater.
It also saves up a lot of space for the sound system, the room looks clear, and there is a lot less tangling with the wires. Most importantly, the picture will be bigger and we can set a perfect viewing angle by aligning the lens with the screen.
Before all that, we got to do measurements, sizing, understating the throw ratio, distance between the unit and screen, vertical offset, use ceiling mounts, and drill holes.
Let’s being with how to mount a projector on the ceiling.
How To Install A Projector On The Ceiling
Mounting a projector on the ceiling is the preferable method for most users, including me, because it saves up a lot of space, doesn’t worry about tripping on the wires on the ground, and improves the overall aesthetics of the home theater.
But, most of us won’t already have a power supply on the ceiling, and ripping out ceilings and floorboards is also a pain in the ass, that is why we are going to show you how to ceiling mount a projector using simple tools, decorative ideas, and clever positioning. We are going to hide those wires as well.
TOP 3 Best Projector Ceiling Mounts Selected by our Team
- Wali Universal projector ceiling mount
- Feldx Universal projector ceiling mount
- VIVO Universal projector ceiling mount
Let’s install a projector on the ceiling using the following simple steps:
#1. Location For mounting a projector
Your wall or projection screen should not receive direct sunlight. You can’t control natural light unless your room is a dark pit, but there is always gonna be some ambient present. Just make that ambient is not falling directly on the projection screen.
I will recommend installing the projector near a wall to hide the wires along the wall.
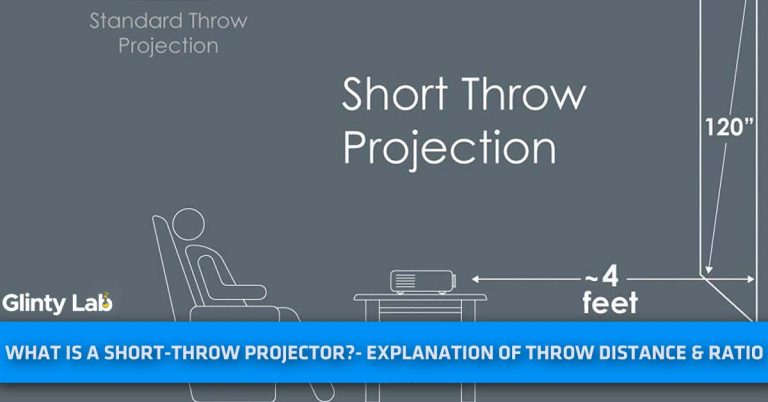
#2. Positioning of the projector – perfect Throw distance.
I am assuming the projector screen is in place, if it is not, learn how to install a projector screen then follow these steps for a DIY projector screen
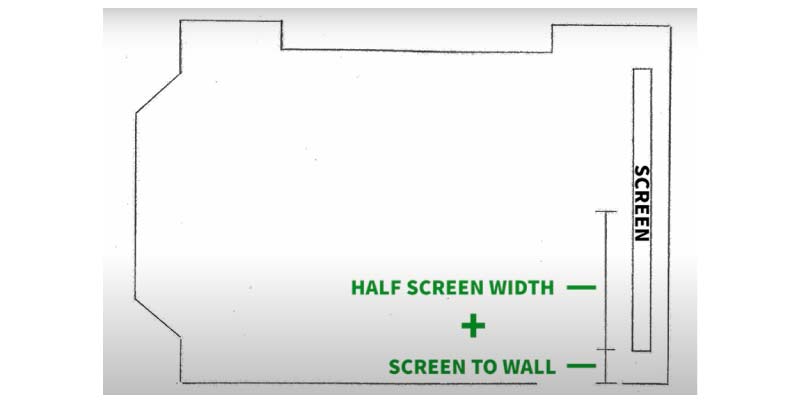
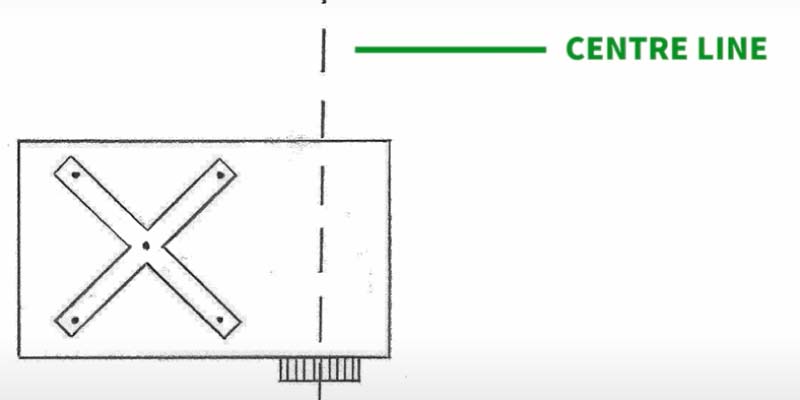
- Measure the distance from the wall to the edge of the screen, and half the width of the screen.
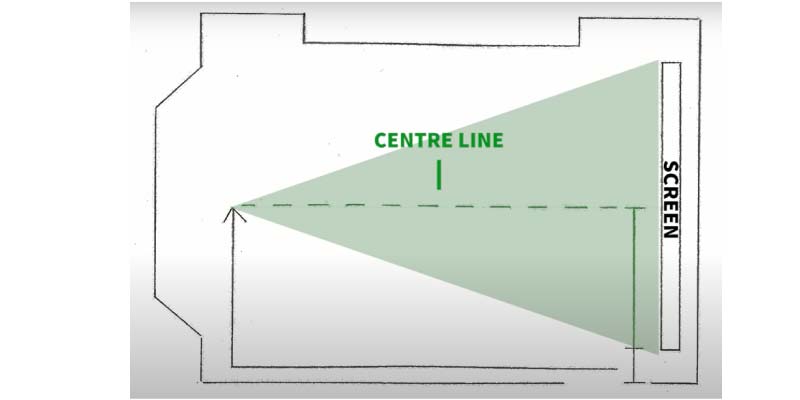
- Mark the noted measurement on the ceiling (where you want to install your projector), measured from the other end of the same wall that you originally measured from. Make sure the throw distance between the projector and the screen is sufficient.
- The throw distance between the projector and the screen depends on the throw ratio of your projector. See the manual for the throw ratio.
- The throw ratio differs from projector to projector. An ultra-short throw will be placed near to the screen, and a normal throw projector 3m to 4m away from the screen.
#3. Ceiling type and mounting type
| Ceiling Type | Mounting Type |
| Cathedral: High rise ceilings are called cathedral | Cathedral ceiling adapter |
| Structural: A non-cathedral ceiling. Normally 8 feet high. Covered usually. | Round ceiling adapter |
| Suspended: A business-type setting. Ceiling tile system | Suspended ceiling kit. |
#4. Projector Mount

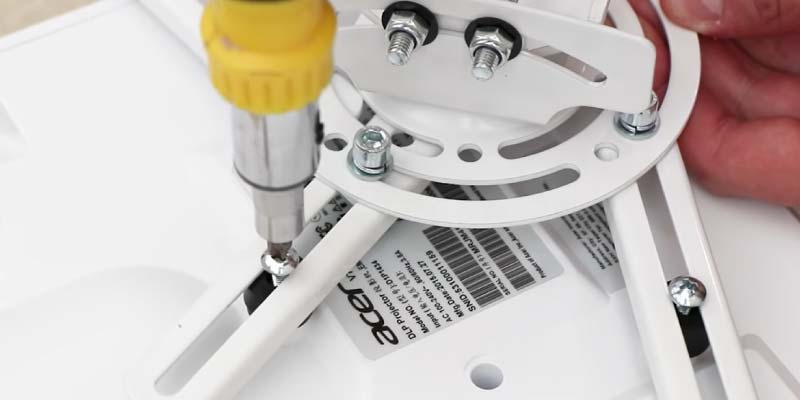
- Loosely attach the mounting bracket on the back on the backside of the projector.
- Check the instructions that came with the bracket.
- You can order one online by searching online. Most projector mounts are universal, others are exclusive to a particular model of the projector.
- Carefully position the bracket so it is in line with the lens. Then tightly fasten the bracket down.
- You can additionally purchase the suspended ceiling kit if your projector is heavy so that the mount can take the load.
- In some models, we cannot position the bracket in line with the lens, then offset that distance when mounting it to the ceiling. It will make sure the lens is central to the screen.
#5. Making holes
If the roof doesn’t have concrete, use the extended wood panel to connect two joists in the ceiling otherwise chances of an accident are high.
Use a drill, and make sure the screws go through studs or joists to support the projector’s weight.
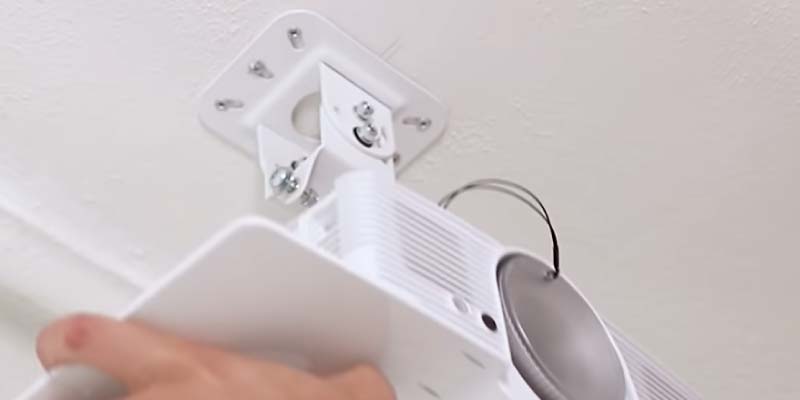
Carefully place the projector on the bracket.
#6. Hooking the cables
I use an external sound source so I will only need an HDMI cable and power source, but it depends on you. Wire up the projector and place it on the bracket.
To hide those ugly wires and for safety purposes, use decorative trunking. Carefully place it into a position where you want to hide the wires. Check out this forum for more insights on how to conceal cords.Â
#7. Adjusting the picture
Some high-end projectors have huge keystone correction (vertical and horizontal), some have less, some have only either vertical or horizontal, and some have neither. If your projector has keystone correction, don’t tilt it up and down, you will end up loosening the screws. Adjust the picture according to your screen from the very beginning.
I would recommend mounting the projector correctly to avoid tilting and using keystone.
There you go, the ceiling mounting of a projector is done.
Ceiling Mount Pros And Cons
- Takes less room
- Better viewing angle
- Less dangling with the wires
- Isn’t much expensive if you can install it yourself which is simple
- If not properly mounted, can fall and break
- The ceiling can be damaged if the holes are not properly drilled.
Checkout our guides about How To Hang Projector ScreenÂ
How To Mount A Projector Without Drilling
Nobodies like drilling in the wall or ceiling of their home. 6 months ago, I mounted my JVC-NX5 in one of my rooms which had a single fall ceiling. I drilled holes between the two joists and mounted the unit perfectly.
I wasn’t aware all of that vibration of the drill made my single fall ceiling weak, it fell. Luckily no one was in the room. Always check your ceiling condition before drilling holes into it to prevent accidents.
There are other ways to mount a projector without drilling holes. Mounting of laser and lamp projector is the same.
A Shelf Mount:

I purchased an IKEA shelf whose shelves are removable. It is about 75 inches tall. Place it in front of your screen, and place your projector on it. I use 3M command strips to hold the shelf in place.
Additionally, I have placed my couch in front after removing the bottom two shelves. Most of the weight will be supported by the couch.
You can use decorative trunking to hide the ugly wires or cable cover strips. Nobody likes to dangle with wires.
Pros And Cons Of shelf Mount
- The power outlet is closer
- Ventilation is greater
- Retrieval of the unit is easier in case maintenance
- Less sophisticated to install
- Shelf takes room.
- If your model doesn’t have a huge vertical and horizontal lens shift, it may be difficult for you to adjust the angles.
- The chance of trip and fall over the unit is always there. Happened to me twice.
Projector Tripod Mount:
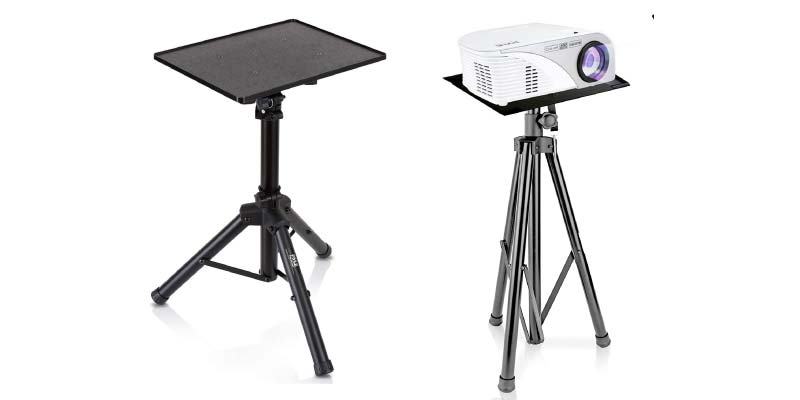
The projector tripod mount is a cheap yet simple hack for people who don’t have either a shelf or ceiling mount kit. The projector tripod mount isn’t bad at all. I won’t it though.
Let me tell you how it is done.
- Get a tripod that can support the weight of your projector.
- A metal plate.
- Depending on the tripod, get a bolt. Normally ¼†bolt does the trick.
- Few screws.
The side panel of any old computer will do the job. Make sure your plate is at least 2cm bigger than your projector so it will not fall off.
Step 2: HolesMakes holes instead of holes because a bigger hole can ruin the metal plate. Make little grooves according to the back of the projector.
Sometimes you would need to cut the screws so that they fit the holes.
Step 3: WiresUse decorative trunking to hide the wires. Projector tripod mounting can be a little messy because it takes someplace, so makes sure to hide those wires properly.
TOP 3 Best Projector Tripod Mounts Selected by our Team
The following three brands are selected by our expert team based on popularity, reliability, durability, and budget.
Conclusion
As an expert, I would ceiling mount for better aesthetics, viewing angle, and to save some space, but wall mounting and tripod mounting also works if you can somehow minimize the ambient light and maximize the viewing experience.
Frequently Asked Questions-FAQs
Q: Are projector ceiling mounts universal?
Projector ceiling mounts are universal, but specific mountings can be purchase for a specific projector model for home theater.
Q: Should I ceil mount my projector?
The ceiling mount is best to save some space and fit the unit closer to the screen than a shelf mount. Your viewing angle will be better as well.
Q: How far should my projector be from 120in screen?
16:10 aspect ratio: 100 – 105 inches away for 120 – 135in screen. 4:3 aspect ratio: 78 – 80inches away for 110 – 120in screen. 16:9 aspect ratio: 95 – 100 inches away for 120 – 130in screen.
Q: Does the projector need to be centered with the screen?
Projector’s lens should be in line with the screen (align with the horizontal center of your screen). Offset installation is also an option but a centered projector is always recommended for the best viewing angle.
Q: How much does it cost to install a projector?
Between 100 to 500 dollars is the average, but it is fairly simple to install by yourself. You and install the screen and the projector in only 1 or 2 hours using the right tools and ceiling mount.
![How To Clean A Projector Lens In A Right Way? – [Step By Step Guide]](https://glintylab.com/wp-content/uploads/2021/05/How-To-Clean-A-Projector-Lens-768x402.jpg)
![How to Hook Up Nintendo Switch to Projector? – [5 Easy Steps]](https://glintylab.com/wp-content/uploads/2022/04/How-to-Hook-Up-Nintendo-Switch-to-Projector-768x402.jpg)